Configuring Auto Provisioning in Microsoft Azure EntraID with SCIM
SCIM allows you to synchronise user information between EntraAD and EdApp.
We only support importing users from EntraID into EdApp, we never send back information to EntraID.
Step 1 - Enable SCIM in EdApp
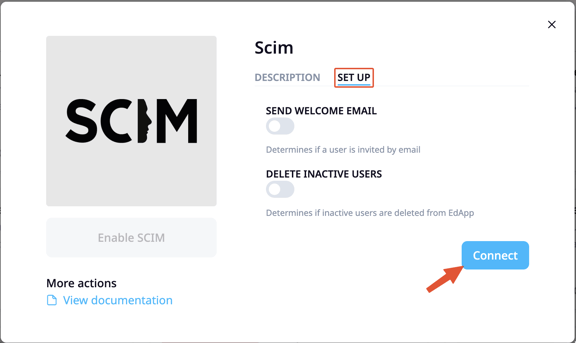
- Access the integrations page from the admin portal then select SCIM
- Select the setup tab to reveal configuration options.
- Choose if you want to send welcome emails to users created through SCIM.
We recommend leaving this option off unless you use SCIM independent of SSO. - Choose whether to delete inactive users.
Deleting users is irreversible. - Click Connect to enable the integration

Step 2 - Enable SCIM provisioning in Microsoft Azure EntraID
To enable automatic provisioning of users
- Go to the Azure EntraID portal and select Enterprise applications
- Select the application that you have created when setting up SSO with EdApp (Configuring SSO with Azure)
- Enable "provisioning"
- Set the "Provisioning mode" to automatic and populate the Tenant URL field with "https://edappintegrations.com/scim/v2"
- In the secret token field paste the API key that can be found at: https://admin.edapp.com/app-settings/api

- Click the "Test Connection" button to see if the setup is successful.
- Save the settings.
Step 3 - Configure the mappings between EdApp and Azure EntraID
To setup custom fields, expand the mappings section and click "Provision Active Directory Users".

The next thing to setup is the mappings between the fields in EntraID and EdApp. Click the "Provision Azure Active Directory Users" link.
By default there are a lot of mappings of which most we will not be using. Delete all the mappings that are not needed and only leave the ones as shown below.

- Save the mappings with the "Save" button at the top.
- Scroll to the bottom of the page and tick the "Show advanced options" box.
- Next, click the "Edit attribute list for customappsso" link.
- In this screen also delete all the fields that are not needed and leave the ones as shown below.

- Save the fields with the "Save" button at the top.
- Now, add a new mapping by clicking the "Add New Mapping" link.
- For the "Source attribute" select "objectId" from the list and for the "Target attribute" select "externalId".
- Click "Ok" at the bottom of the page.
- Click "Save" at the top of the page.
- Custom fields
If you have another identifier in your EntraID system that uniquely identifies a users, you can also use that as the "externalId"
Step 4 - Adding custom fields
With mappings you can also populate custom fields in EdApp.
Assuming that the custom fields have been setup in EdApp, we now need to add them to the "customappsso" by clicking the "Edit attribute list for customappsso" link. In this example we are adding the "department" field.
The name of the attribute needs to have a specific format. "urn:ietf:params:scim:schemas:extension:enterprise:2.0:User:{custom field name}", see example below. Make sure to use the "Field Name" from EdApp, not the "Field Label".

Click Save.
Please note that we only support fields of type "string"
Now we can add the mapping between the EdApp field and the newly added attribute by clicking "Add New Mapping".
In this example we choose the "department" as the "Source attribute" and the newly added attribute as the "Target" attribute.

Click Ok and Save.
When the newly added attribute does not show up in the drop down list, refresh the page as that will refresh the values.
Please note that we only support "direct" mappings