Please take note that setting up/editing a published course will result in a new version. You may revert your course to draft and then republish so it will not result in a new version especially if you just made minimal changes to it.
More information here: Versioning
Contents
🔍 Navigation
1. Click on the course
2. Select 'Next: Set Up →' (upper right-hand corner) 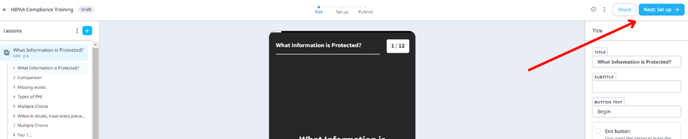
📖 Overview
The Overview display allows you to upload a course image and change the Course Title and Description. You may click on 'Theme' to edit how your courses and lessons look.
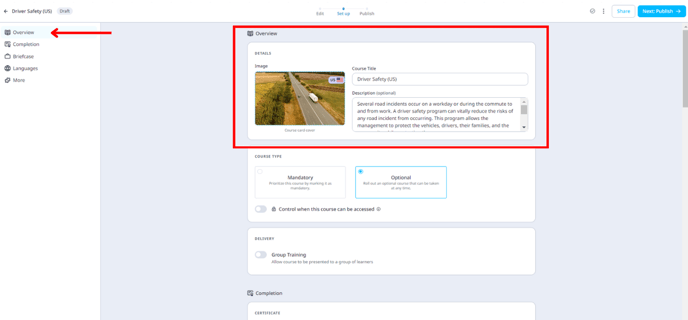
Course Image – This image represents your course and is displayed in the learner's app and the admin portal. Recommended: 1280 x 700px.
Course Title and Description – Your course title and description will appear below your course image in the app.
Here is an article on Course Level Branding: Course Theme
🏵️ Overview: Course Type
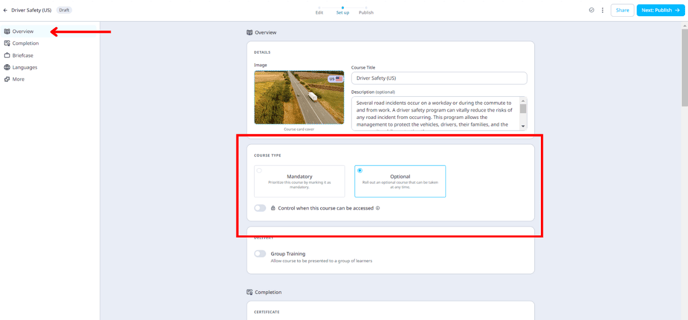
Set course as Admins and authors have three options to set course as.
- Optional - The course can be taken at any time.
- Mandatory - The course is required to be completed and prioritized. the course moves to the top of the learners' course list.
- Due date: Admins and authors can enable this option to make the course due on a date. More information here: Access and Due Dates for Courses
- Recurring (for early access customers) - This automatically re-enrolls learners into the course once it has expired. More information here: Recurring Certification
The date determines when this course can be accessed - access start dates are no longer supported. Access end dates can be set, after the access end date has passed locked content will be visible to users but they will not be able to access the course.
Please refer to this guide for a detailed overview of setting dates and access dates.
👥 Overview: Group Training
Group training is a mode of presenting your EdApp training courses to learners. It is used to conduct in-person training sessions in a group environment and capture attendance.
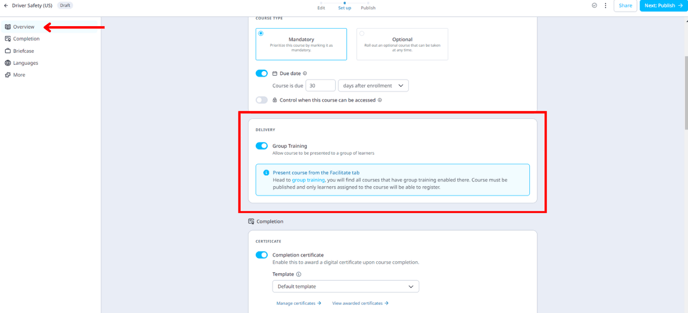
More information here: Group Training
🎫 Completion: Certificates
Reward or certify your learners! Learners can receive a digital certificate after completing a course. These are first set up in 'App Settings' but then are enabled per course depending on what courses Admins would like learners to receive certificates for.
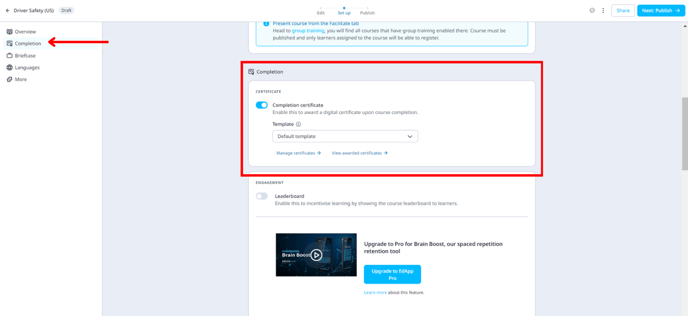
Admins may select which Certificate template they want this course to use. They may also view which of their users have received a certificate by clicking on 'View awarded certificates'.
By clicking on 'Manage certificates', admins will be brought to the App Settings where they will be able to customize their Certificate templates.
More information here: Course Completion Certificates
🎮 Completion: Engagement
On the Engagement tab, you can enable a leaderboard for the course. Course leaderboards can be advantageous over normal leaderboards as learners may all be assigned different amounts of content. Normal leaderboards will count any scores that are earned during that time, whereas course leaderboards will only count the scores earned on that course.
You can also enable Brain Boost for these courses through this tab. All you would have to do is click on 'Boost Slides'
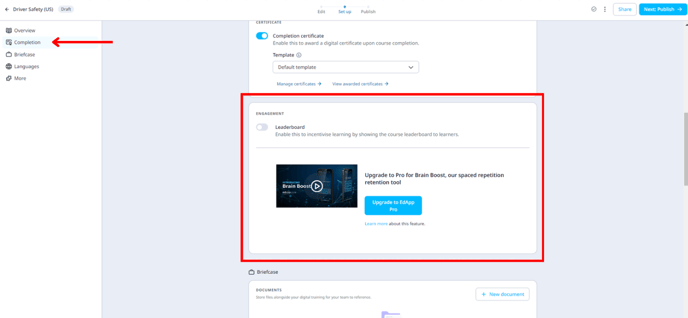
More information here: Leaderboards, Brain Boost
Please take note that Brain Boost is only available to paid plans.
If you want to remove the course leaderboard this can be done by going back to the course 'engagement' tab and disabling the leaderboard.
💼 Briefcase
Attaching additional resources to your courses is made easy with these steps.
You can add PDF documents, images, videos, PowerPoint presentations, and Keynote or Pages documents.
1. Navigate to the Course page and click on the 'Briefcase' tab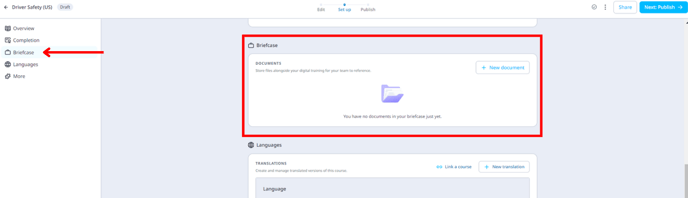
2. Click the '+ New document' button
3. Specify a title before uploading a document.
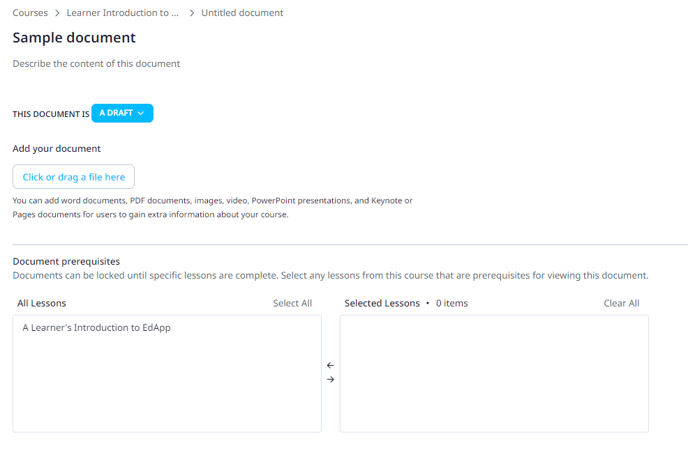
4. It's always helpful to add a description for the content of the document to indicate what the users will be looking at.
5. Upload a file by clicking on the 'Click or drag a file here' button or drag and drop the document into the 'Add Your Document' area of the page
The document size limit is 60MB
6. Once the document is uploaded you can replace it by dragging and dropping a new document into the 'Add Your Document' area of the page. You may also delete the document by clicking on the 'Remove' button.
7. If necessary, you can set Document Prerequisites to prevent the learner from viewing the document until specific lessons of the course are completed.
8. Make sure to publish this so learners can access it. Changes will be saved automatically.
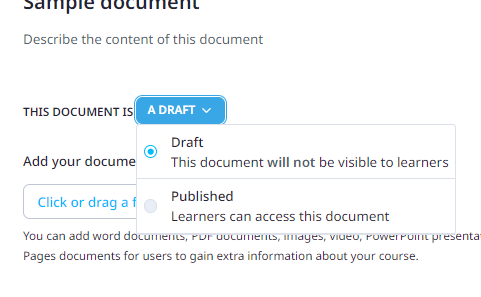
The document will automatically be on draft unless changed by the admin
9. If you need to attach another document to the course’s briefcase repeat steps 3-10.
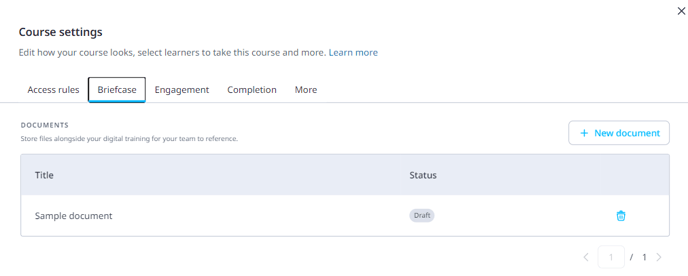
In the example below, you can see that the briefcase document named "Example" is yet to be published, because there's a tag beside it that tells you so.
10. You can remove briefcase documents at any time by interacting with the 'trash can' icon beside each document title.
11. Learners will now have access to the published Briefcase documents.
🌏 Languages
Whether you're fluent in another language or wish to reach a broader audience, this feature empowers you to break down language barriers and connect with learners worldwide.
More information here: Language Translation, AI Translation, Manual Translation
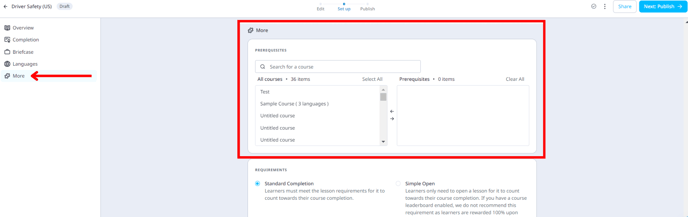
🔢 More: Prerequisites
The users must complete a certain lesson before they have access to this course. The user will see a small lock symbol on the content until they have completed the prerequisite material. They will also have a prompt of what is required for them to unlock this course. Anything in the right table will be a prerequisite to the lesson that the Admin is configuring.
✅ More: Requirements
The completion tab enables Admins to set a number of different requirements on the course for it to count as completed for a learner.
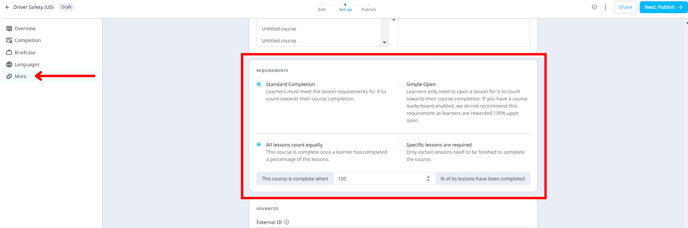
Standard completion – learners must fulfill the lesson completion requirement in order for it to count towards the course completion
Simple open – learners only need to open the lesson for it to count towards the course completion.
All lessons count equally – the course will be completed once the learner completes a certain percentage of the lessons. By default, the percentage is at 100% but this can be changed if the admin requires. If left at 100% then all lessons will need to be finished for the course to be complete.
Specific lessons are required – this will dictate what lessons are required to complete a course. Once clicked, there are two tables where admins can toggle lessons within the course. Any lessons on the left will be optional (and therefore will not be required for completion) and lessons on the right will mandatory to completing the course.
Any type of lessons created after this is implemented will automatically fall in the left table, so admins must be careful to move them across to the right if they want all lessons to count toward completion.
💬 More: Advanced
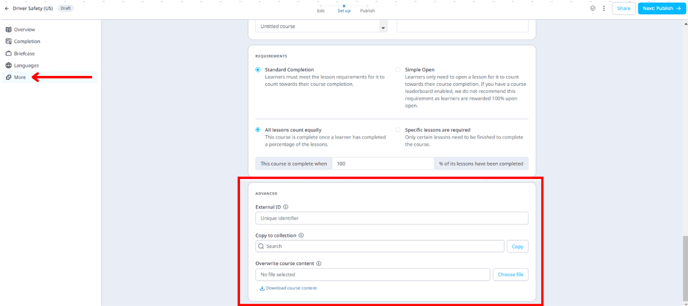
External ID - an external ID is typically a unique identifier assigned to courses by an external system or source. This external ID is used to correlate and manage course data across different systems or databases.
Copy to course collection - In the more tab, Admins can copy the course into another course collection. The course collection must be created before trying to copy courses into it otherwise the course will not be able to be copied anywhere. The briefcase documents will also be copied over when the course is copied.
*Useful to note – when a course is copied, all the lessons within the course and the course itself are automatically drafted so the admin can reconfigure the settings on the copied version of the course.
Overwrite Text Resources - this feature allows the admin to download the text resources of the course and upload an updated version to overwrite course content.
Here is an article with a step-by-step guide on how to use this feature: Overwrite Text Resources