Convert PDF, PPTX, and DOCX files to courses
Turn your PDF, PPTX, and DOCX into an editable EdApp microlesson in seconds.
Contents
Converting your file to EdApp microlessons
FAQ
Limit
One of the easiest ways to get started creating content in EdApp is through our document conversion tool available for any Plan users. This feature makes it easy to upload an existing file into EdApp to build the starting points for your microlesson.
Step 1: Prepare your file
You can upload a PDF, PPTX, and DOCX file with a maximum of 100 MB. The upload will pull in everything in the document so be sure to remove any additional text or images you don't want to be converted.
- Videos, audio files, and links will not convert. You can add these after conversion.
Step 2: Choose how you want to convert your file
Log in to the Admin Portal (admin.edapp.com). Click the Create course button, then select Convert document.
 You would then have two options: AI conversion and Direct conversion.

Depending on the file you are converting, select the following:
-
-
AI conversion: For a PDF, PPTX, or DOCX file where you want to keep the text intact while enhancing the document with AI-generated images and questions.
-
Direct conversion: For a PPTX file when you want to retain the original content.
-
Step 3: Upload your file

You can then upload the file you wish to convert by dragging the file or clicking on the browse button.
Step 4: Review the conversion results
- For
AI conversion:
Once you have uploaded your file, you will automatically be taken to our creator tool, where you can update the branding, add new slides, and adjust the content and layout of existing slides. See the help articles below for further instructions:
- For
Direct conversion:
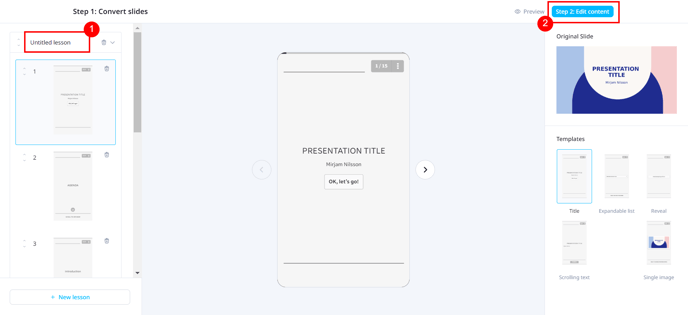
Once you have uploaded your file, you can review the conversion results against your original PowerPoint slides.You have the option to select between different slide templates. This allows you to quickly improve the layout of slides before making any advanced edits.
Use the "Single Image" template for more complex slides. This provides a screenshot of your original slide.

You can break up larger training courses into microlessons by creating a "new lesson" and moving existing slides into the new lesson.
We recommend 10-15 slides maximum per lesson to keep the content bite-sized!
Step 3: Edit slide content
To make advanced edits to slide content, press 'Edit content'.

This takes you through to our creator tool, where you can update the branding, add new slides, and adjust the content and layout of existing slides. See the help articles below for further instructions:
Step 4: Publish and share!
Once you're happy with your shiny new micro-training, hit publish and share with your learners when ready. That's it!
Limitations
-
Our document conversion feature will try to output text as close as possible to the original file uploaded, but since it generates text, it may not be an exact one-to-one representation of the document.
-
The AI will attempt to read tables, but the output may vary depending on how the table in the original document is formatted.
-
Diagrams may be difficult to extract, particularly diagrams from PPTX presentations.
The quality and organization of an AI-generated course can vary based on the complexity and formatting of the original document. Although our document conversion feature aims to create a structured course, manual adjustments may be needed to achieve the desired outcome.
FAQ
Q. What are the requirements for submission?
For AI conversion, the file must be in PDF, PPTX, or DOCX format and must have a maximum size of 100 Mb.
For Direct conversion, the file must be in PDF, PPTX, or DOCX format and must have a maximum size of 100 Mb.
Q: How can I change a keynote into a pptx?
On your keynote, go to "File" > "Export to..." > "PowerPoint", make sure you choose the "pptx" format on the advanced option. To see a step-by-step guide, click here.
Q: What do I do when I get a Network error?
Check your internet and please try again.